Shopify Smart Checkout plugin
Our Shopify Smart Checkout plugin allows you to accept payments via Viva Smart Checkout in your Shopify store.
- Overview
- Supported payment methods
- Before you start
- Setup instructions
- Upgrading the plugin
- Get Support
Overview
- Supported currencies: CZK (Czech koruna), DKK (Danish krone), EUR (Euro), GBP (Pound sterling), HUF (Hungarian forint), PLN (Polish złoty), RON (Romanian leu) & SEK (Swedish krona)
- Pricing: A surcharge of 0.35% is applied on top of the acquiring fee (for the acquiring fee please refer to the pricing page of our website)
This plugin uses our Smart Checkout solution. Please see our video overview of Smart Checkout’s main features and benefits:
Features
- Increased conversion: dynamically shows payment methods most likely to convert
- Customer preferences: remembers past payment behavior and preferences of the customer across merchants and countries
- Saved cards (customer-side): customers can pay using cards they have saved during past purchases, even from other merchants; thus, saved cards are available even to first-time customers. The customer does not need to create an account to save a card or re-use saved cards. New merchants take advantage of the pool of already saved cards across the Viva ecosystem
- Card tokenization (merchant-side): the merchant can save the card tokens of their customers in the merchant backend, and then use the saved card tokens when the merchant will redirect their customers to Smart Checkout again in the future. The saved card tokens provided by the merchant will then be presented to the customer on Smart Checkout to use and pay with
- Decline recovery: based on the customer’s past payment behavior, we prompt the customer to re-try a declined payment
- Installments: the customer is able to pay via installments, where applicable (available in Greece only)
- Recurring payments: not supported yet
- Pre-authorizations: Supported. Please activate the “Allow recurring payments and pre-auth captures via API“ setting on your Viva.com banking app before enabling them on Shopify. For more info check here.
- Mobile optimized: offer an optimized browsing experience on any device (mobile, tablet, laptop, or desktop)
- Local languages & currencies: support for 17 languages (English, German, French, Italian, Spanish, Polish, Romanian, Dutch, Greek, Czech, Portuguese, Swedish, Hungarian, Bulgarian, Danish, Finnish, and Croatian), and 8 currencies
- Cross-border payments: Supported for all payment methods; you can accept payments from international customers for all payment methods
- Cross-currency payments: Not yet supported; your customer can only pay you in the currency of your business account
- Compliance & security: full PCI & SCA/3DS support utilizing SCA exemptions, along with advanced fraud protection using Machine Learning algorithms
- Constantly self-updated: regular self-updates with no coding required from you, to a) offer new payment methods, b) offer new conversion-improving features, and c) comply with all the latest regulatory and security requirements
- Single account: No need to have a separate account for settlement
- Next day settlement: Money from customer payment is available in your Viva account the next day
- 0% Acceptance fee: Use your Viva Debit Mastercard to pay for your business expenses and lower your payment acceptance fees up to 0%
- Scalability: Through our reliable and state-of-the-art cloud-based infrastructure, you won’t miss a payment
User experience
Screenshots
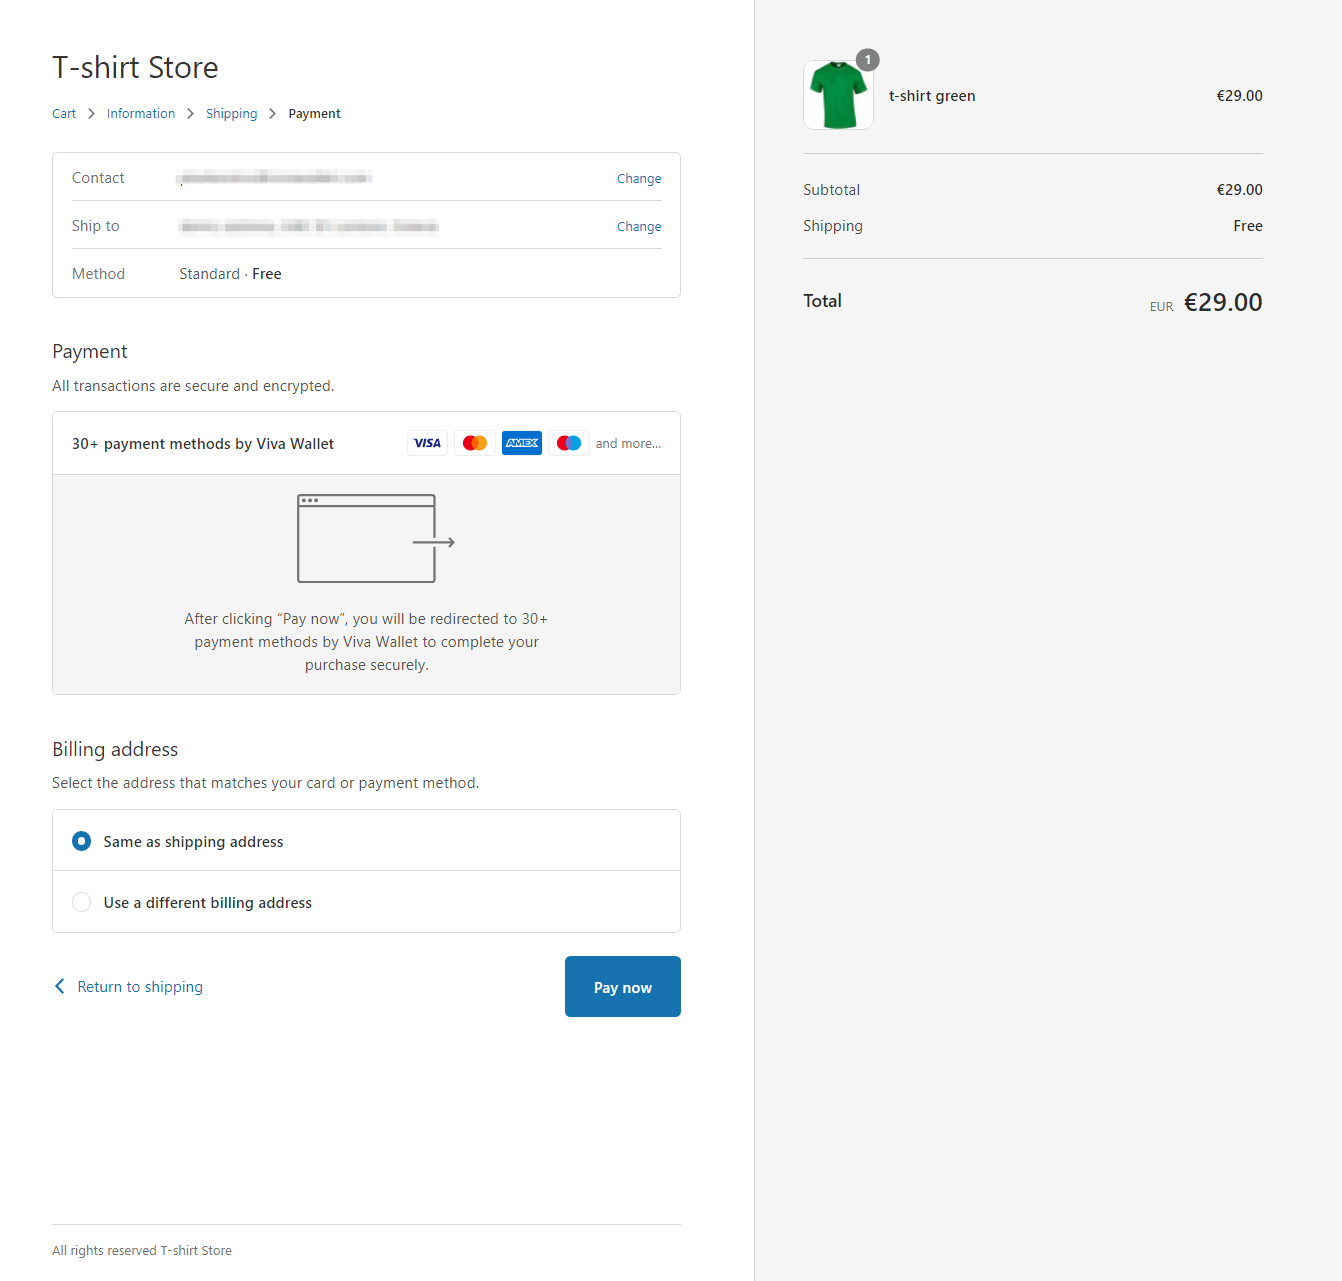
This plugin uses our Smart Checkout solution. Customers are redirected from your checkout page on your Shopify store to Viva Smart Checkout to pay, and after the customer pays, they are redirected automatically back to your Shopify store.
The below images show:
a) a demo checkout page on Shopify, and
b) a demo Viva Smart Checkout:

Video
The below video shows the user experience from your checkout page to Viva Smart Checkout.
Supported payment methods
Smart Checkout supports a wide variety of payment methods, including:
- Cards (Visa, Mastercard, American Express, Maestro, Bancontact, JCB, Discover & Diners Club)
- Digital wallets (Samsung Pay, Viva Wallet & MobilePay Online)
- Local payment methods (BANCOMAT Pay, Bancontact QR, BitPay, BLIK, EPS, iDEAL, IRIS, Klarna, MULTIBANCO, MB WAY, P24, PayU, Swish, tbi bank, Trustly & WeChat Pay, BlueCode)
- Direct Debit & other payment methods (SEPA Direct Debit, Pay By Bank, Cash (Viva Spot) & e-banking (ΔΙΑΣ/DIAS))
 |
 |
 |
 |
 |
 |
 |
 |
 |
 |
 |
|
 |
 |
 |
 |
 |
 |
 |
 |
 |
 |
 |
|
 |
 |
 |
 |
 |
 |
 |
 |
Before you start
Step 1: Create Viva account
If you do not already have an account with Viva please create an account.
- Sandbox/demo account for testing purpose.
- Production/live account for payments in the real world.
Step 2: Generate Shopify credentials
Before doing anything, you need to grab your Viva Client ID and generate your unique Client Secret, following the below steps.
Sign in to the Viva banking app and select the required account.
Click on Settings > API Access and scroll down to the Shopify Smart Checkout Credentials (PP) section:

Click on the Generate a pair of credentials button.
A pair of credentials is generated.
Your unique 32-character Client Secret is now displayed in the Client secret field below ClientID:

Make a temporary note of your Client ID and Client Secret for later use.
Step 3: Determine your payment methods
Determine which payment methods you want to offer to your customers.
Some of these payment methods are automatically activated for you by us, other payment methods can only be activated by yourself, for others you need to get in touch with us to activate them for you after a further review of your business.
Setup instructions
PLEASE NOTE: This plugin offers multi-store support, so you can install it on multiple Shopify stores you may have.
You have to use the same Shopify Credentials for all your Shopify stores. Please make a note of your unique Client Secret until you complete the setup of the plugin for all of your stores.
1) Install the plugin on one Shopify store
2) Proceed to install the plugin on the next Shopify store
3) Repeat the process (steps (1) and (2)) if you have three or more stores
You can also install the Viva Wallet plugin directly from the Shopify App Store: https://apps.shopify.com/viva-wallet
1) Click “Add app” to open your Shopify admin (log in if prompted).
2) Select the store where you want to install the app.
3) Review the requested permissions and click “Install app” to complete the setup.
Adding the Shopify Smart Checkout plugin consists of the following steps:
Step 1: Add Viva Smart Checkout plugin to your Shopify store
Installation video
Please see our video on how to install the Viva Smart Checkout plugin in your Shopify store:
Installments (Only Greek Accounts)

- Setup Installments Field: Example: 90:3, 180:6. Order total 90 Euros -> allow 0 to 3 instalments. Order total 180 Euros -> allow 0,2,3,4,5 to 6 installments. Leave empty in case you do not want to offer instalments. Max installments 36.
Step 2: Set your store currency
One final thing to check is that your Shopify store currency matches that of your Viva account. For instance, if your Viva account was set up in the UK, the Viva account will be in GBP, so you must set the Shopify currency to the same, i.e. GBP in this example. Please see below for instructions on how to change your store currency.
To set your store currency, you should follow the below steps.
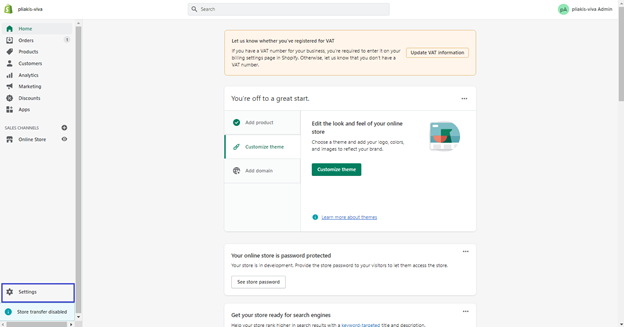
1. Click on Settings in the bottom-left corner of your Shopify home page:
2. You may find at the bottom of the pop up the current store currency.
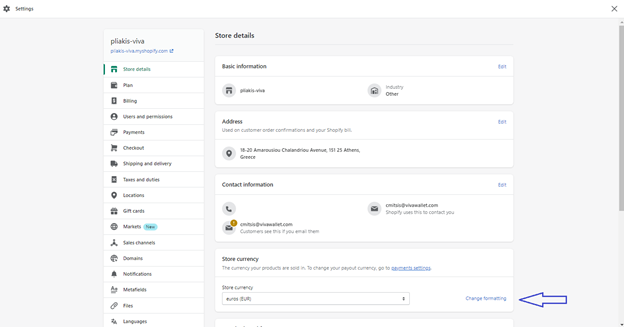
3. Click on the Store currency dropdown menu and choose one of the currencies supported by Viva.
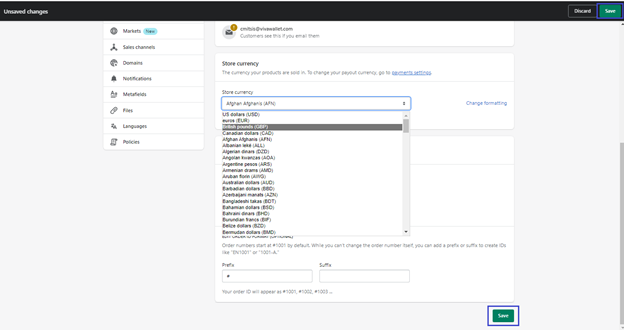
4. Click on the Save button to make your choice permanent.
Upgrading the plugin
Shopify plugin updates are done automatically so you never miss a new version.
Get Support
If you would like to integrate with Viva, or if you have any queries about our products and solutions, please see our Contact & Support page to see how we can help!